Vending Machine settings
To list all the vending machines in the organization, visit Vending Machines page.
From this page, you could
- Retrieve vending machine QR Code
- Update vending machine information
- Change product map / product placement / planogram settings
- Manage actuators (hardware controllers)
- Refill the machine
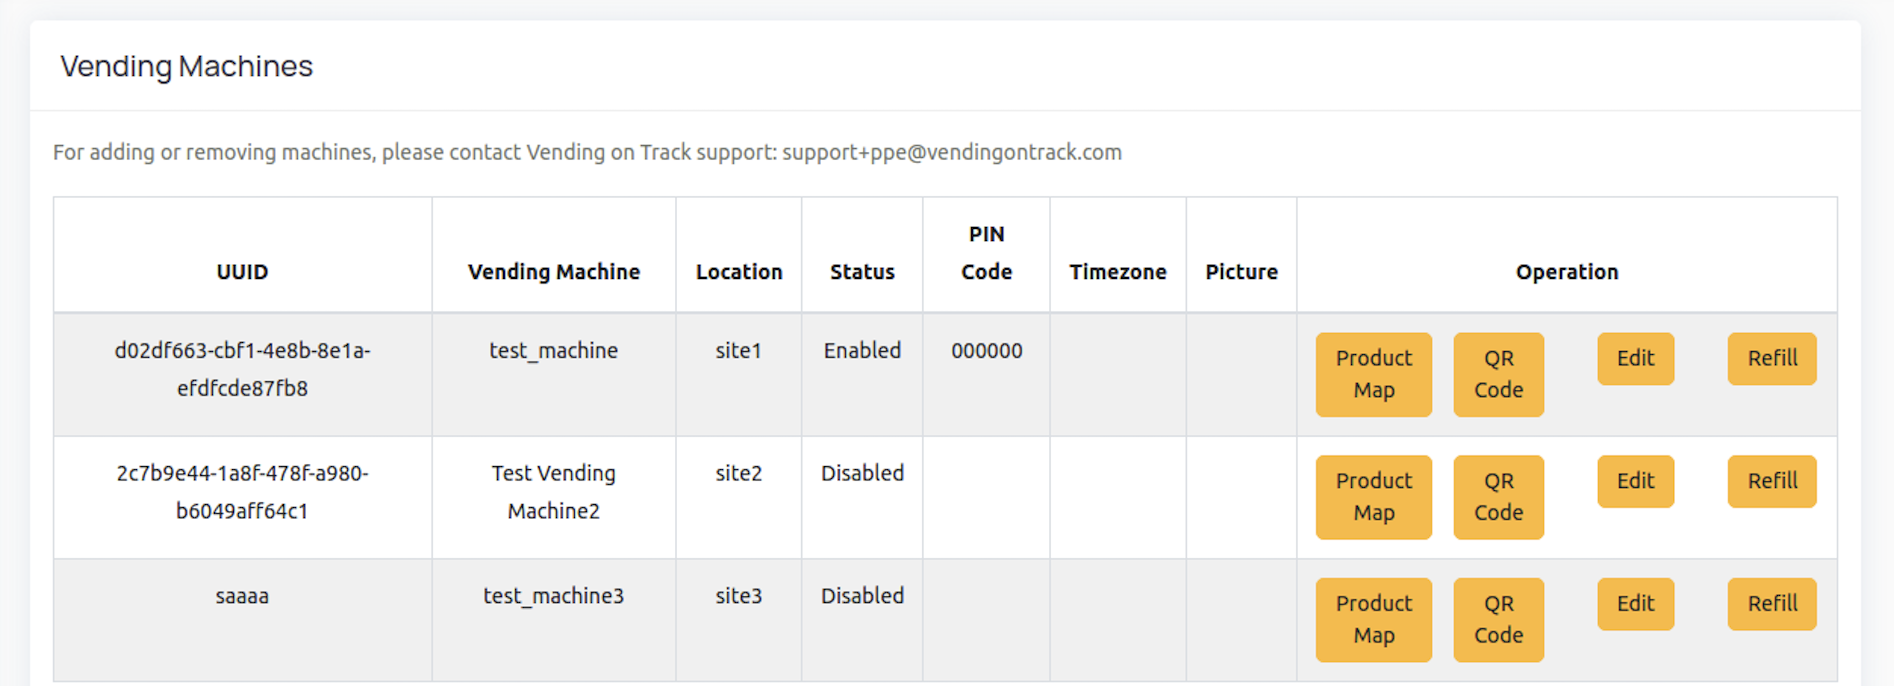
On this page, there is a list of vending machines. It has the following columns,
- UUID is the unique identification number of the vending machine.
- Vending Machine is the vending machine’s name. If Vending on Track recorded hardware details for the machine, a blue i icon appears next to the name — hover over it to see the model, serial number and any notes recorded for that machine. These details are set by Vending on Track and cannot be edited here, so they still identify the original hardware after you rename the machine. Machines with no hardware details recorded show no icon.
- Location shows the deployment location of the vending machine.
- Status shows the vending machine’s connectivity at a glance, checked afresh each time you open the machine list. A machine that answers, or that has contacted the system within the last 30 minutes, is labelled Online; one that does neither is labelled Offline. Connectivity is checked again in the background every 10 minutes, which is what raises the alerts described below — so a machine can be labelled Offline on the list before anyone is emailed about it. A “Last seen” timestamp shows when the machine last contacted the system. If a machine stays offline for 45 minutes, an alert is raised and emailed to any notification email addresses configured for the machine, and to administrators who have failure alert emails switched on in their profile. The alert is sent once per outage, not on every check, and a machine that has never been online — one that is set up but not yet installed — does not raise one. The alert names the time the machine was last seen online, written in your own timezone — the one set in your profile if you are an administrator, otherwise the machine’s timezone, otherwise your organization’s — and states which timezone that is, so a machine reported from another state or country still reads correctly. If a machine stays Offline for an extended duration, please contact the Vending on Track support team immediately. If a particular machine is expected to be unreachable and you do not want to be alerted about it, turn on Disable Offline Notifications in its settings — the machine keeps reporting its status here, it simply raises no alert.
- PIN Code is the code for access to the admin portal on the vending machine.
- Timezone shows the timezone applied by the machine.
- Operation allows the administrators to update the planogram and other information.
Product Map
Product Map is also known as Planogram or Product Placement. It’s a relationship between each coil of vending machine and the product. For example, Selection 0301 could be the Safety Helmet, while Selection 0302 could be the Safety Harness. This arrangement is called Planogram or Product Map.
Product Map requires to be maintained by the administrators so that the consumption report could be accurate.
The administrator is required to update the product map if there is a change on the coil or product.
Motor Coupling (For the video introduction, click here)
KioskForce vending machines have innovatively introduced the feature of motor coupling, which allows operators to manually couple two separated motors to make them operate in sync.
On the Product Maps page, the admin can couple motors,
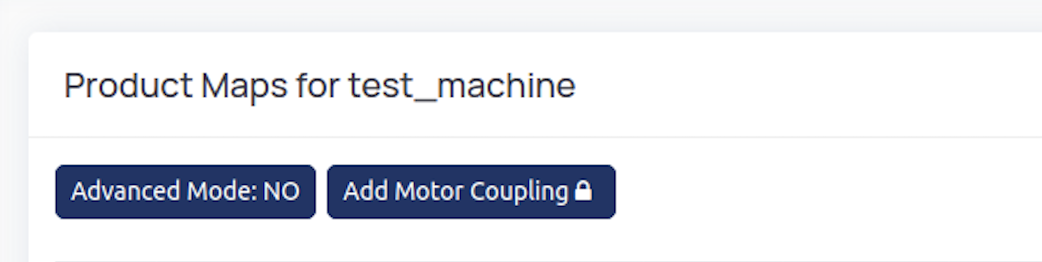
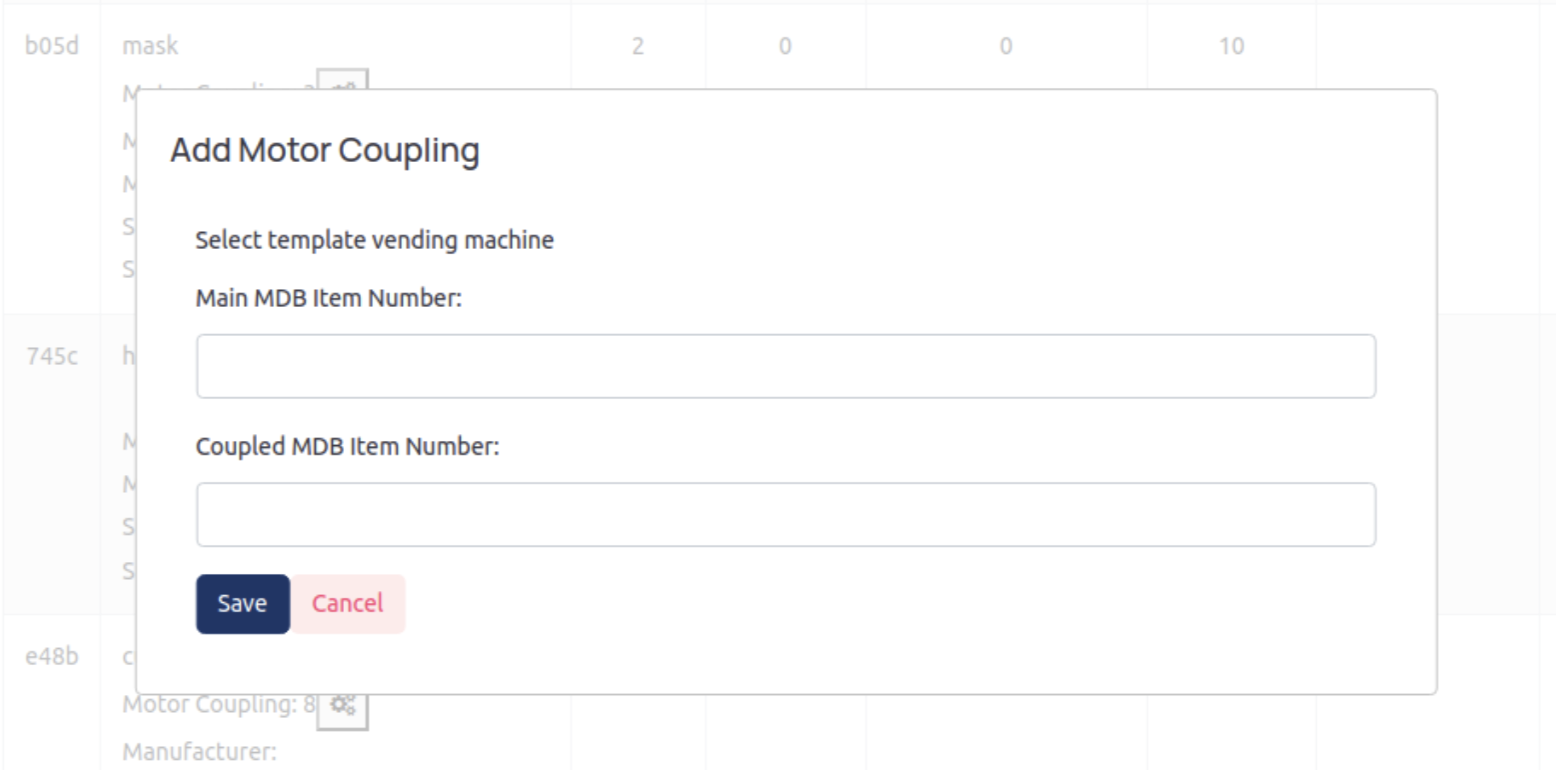
Click Add Motor Coupling button, input the Main MDB code and Coupled MDB code as required. 
Product Map settings
To list product map settings, please follow this procedure,
- Visit Vending Machines page
- Find the vending machine on concern, and click Product Map button in the Operation column
- There are a few attributes for each of the selection/coil,
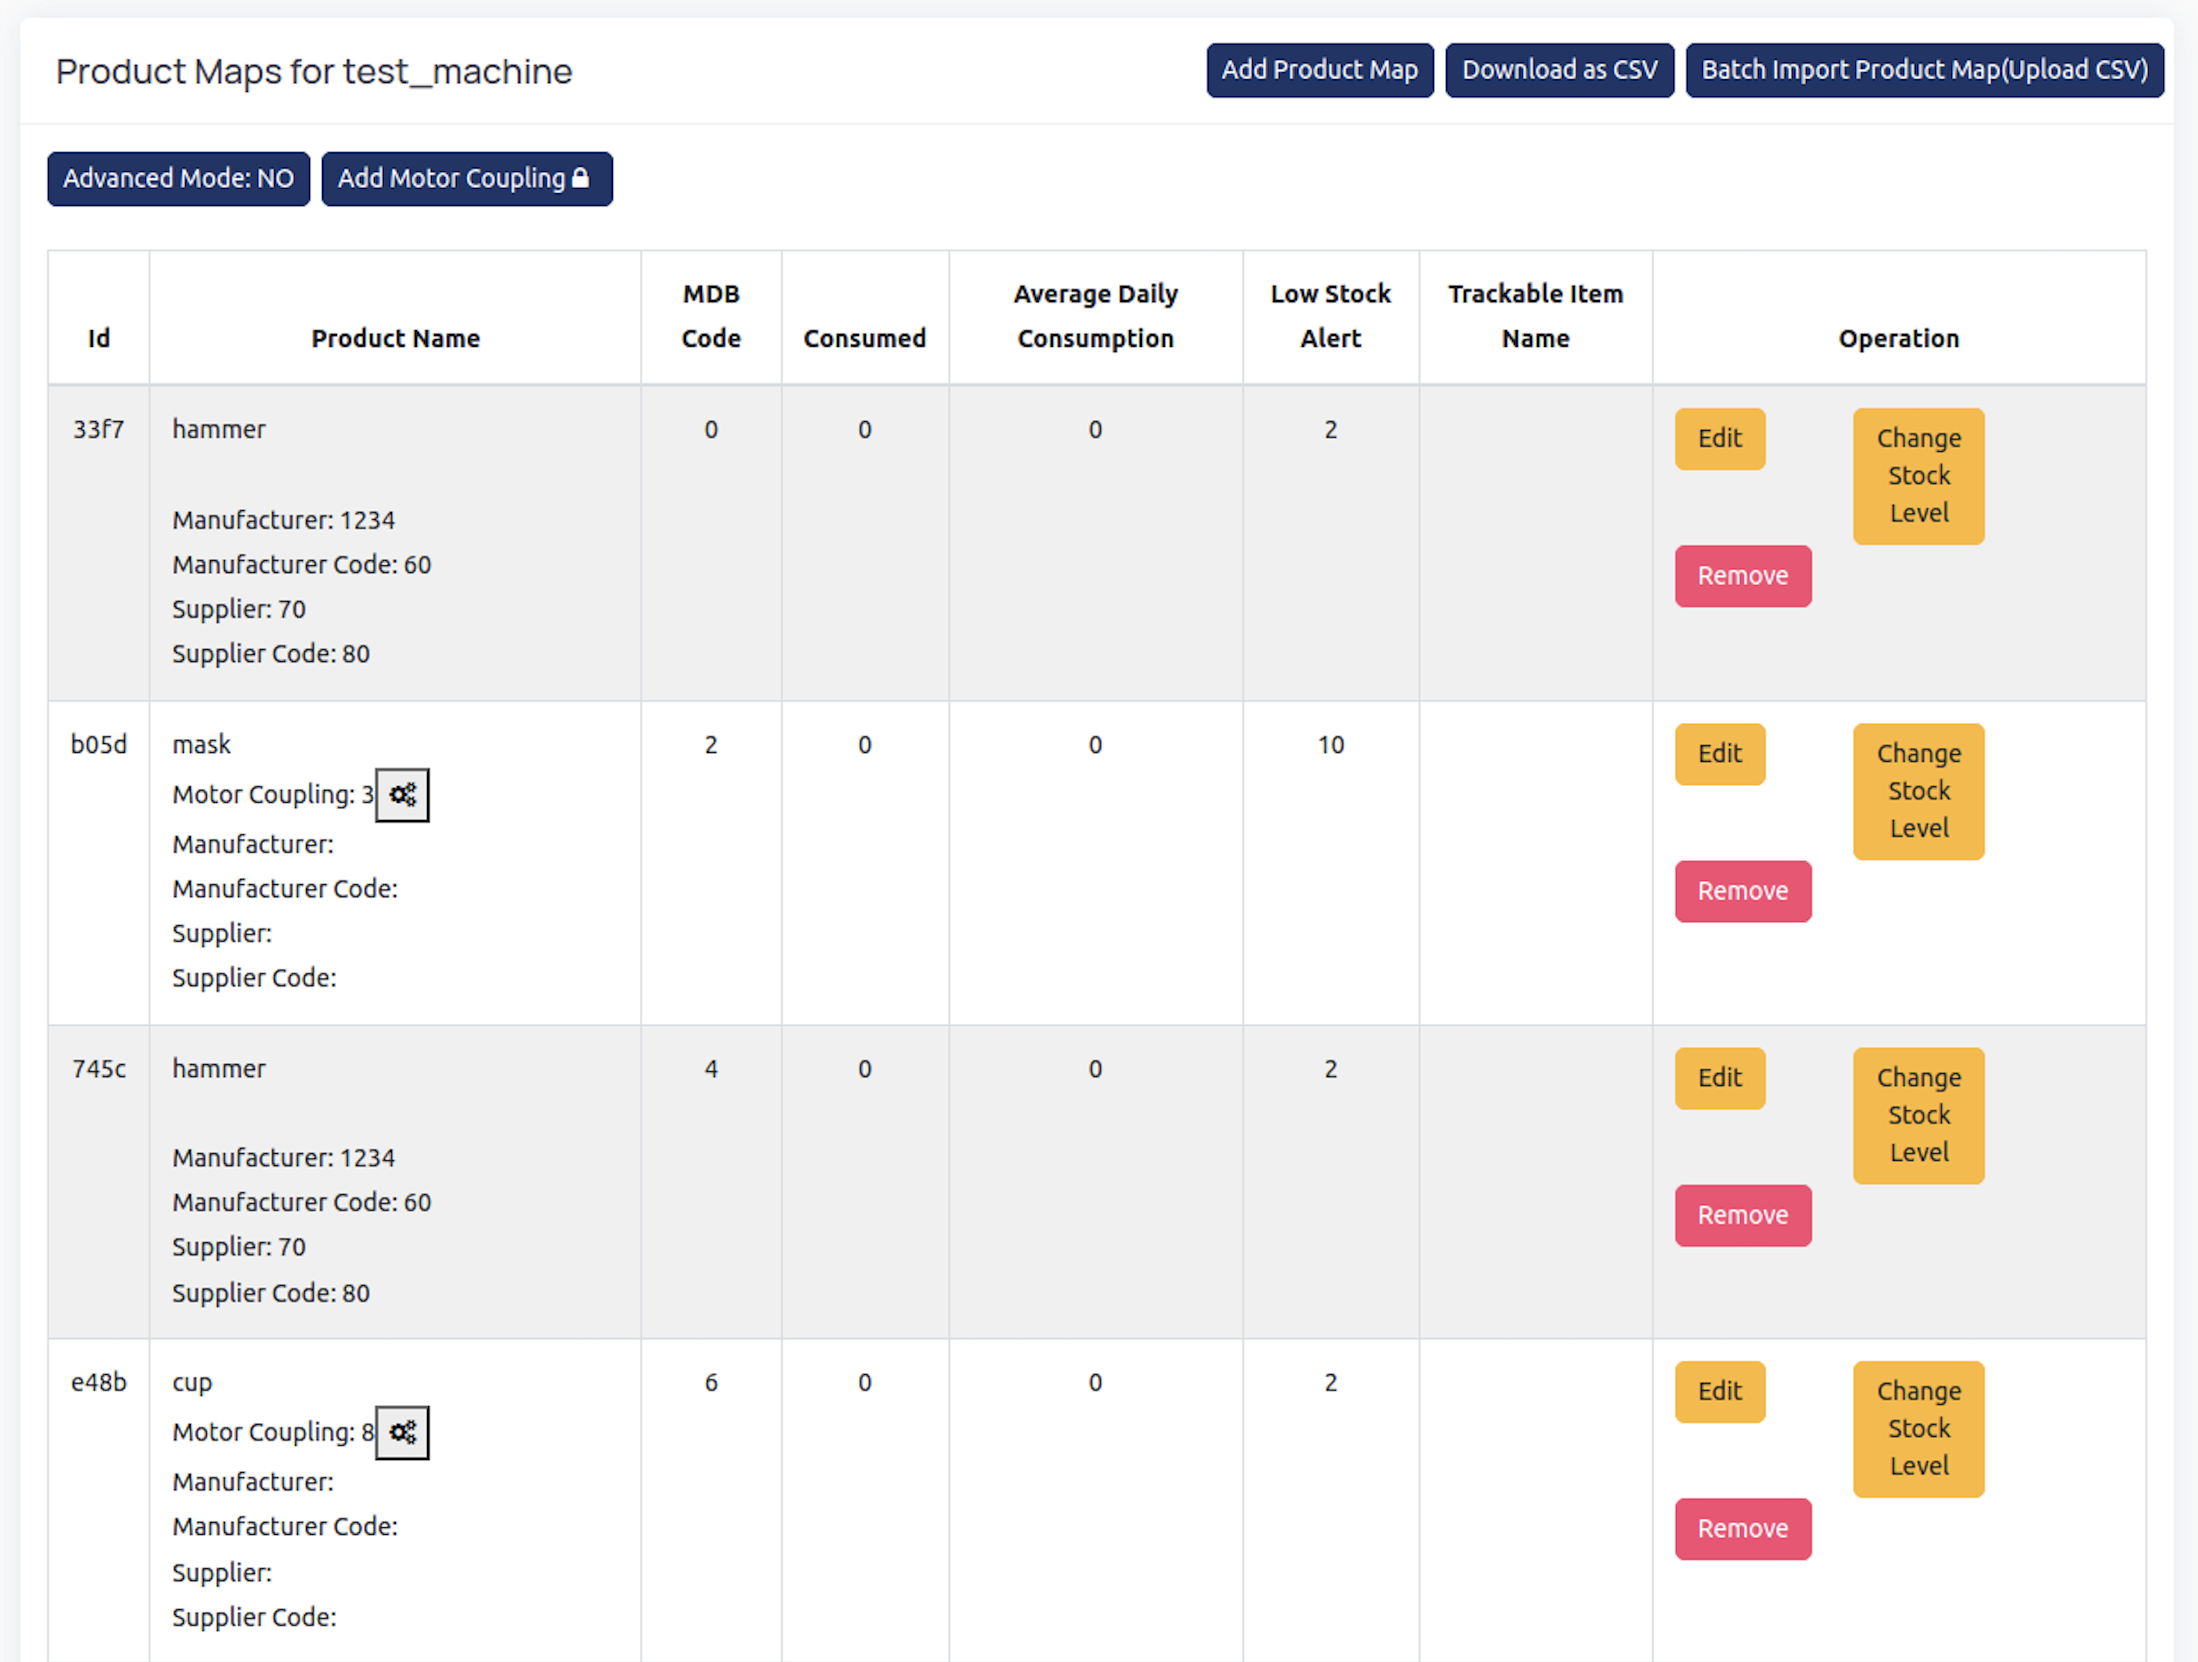
- ID is the unique identity of the coil/cell. It’s automatically assigned by Industrial Vending’s server.
- Product Name is the product associated with this coil/cell, including the manufacturer, manufacturer code, supplier, and supplier code. For example, Selection 0304 could be Face Mask or Safety Helmet. If the coil is coupled, it will show a Motor Coupling state.
- MDB Code is the coil’s identity in the vending machine or the cell’s identity in the locker. This value is typically set by Vending on Track’s account manager or distributors before the machine leaving the warehouse.
- Consumed is the current consumption from last refill activity. If Advanced Mode is enabled, there is additional information in this column,
- Current - The current stock level
- Cap - The maximum capacity of this coil
- Restock - The standard product quantity of the coil
- Average Daily Consumption refers to the number of the average usage of the product over a period of 30 days.
- Low Stock Alert is the value at which the admin will receive a low inventory alert. When the number of items in this coil reaches or drops below this value, the admin will receive a low inventory alert to facilitate timely replenishment.
- Trackable Item Name is the individual item name of the trackable product associated with the cell.
Selections are listed in MDB Code order, lowest first, and counted as numbers rather than text — so coil 9 comes before coil 10, not after it. The kiosk shows the machine’s items in the same order, so what you see on this page matches what an employee sees at the machine.
Operation
To update a product map, click Edit button on this page in Operation column, and a popup window will be displayed on the screen, 
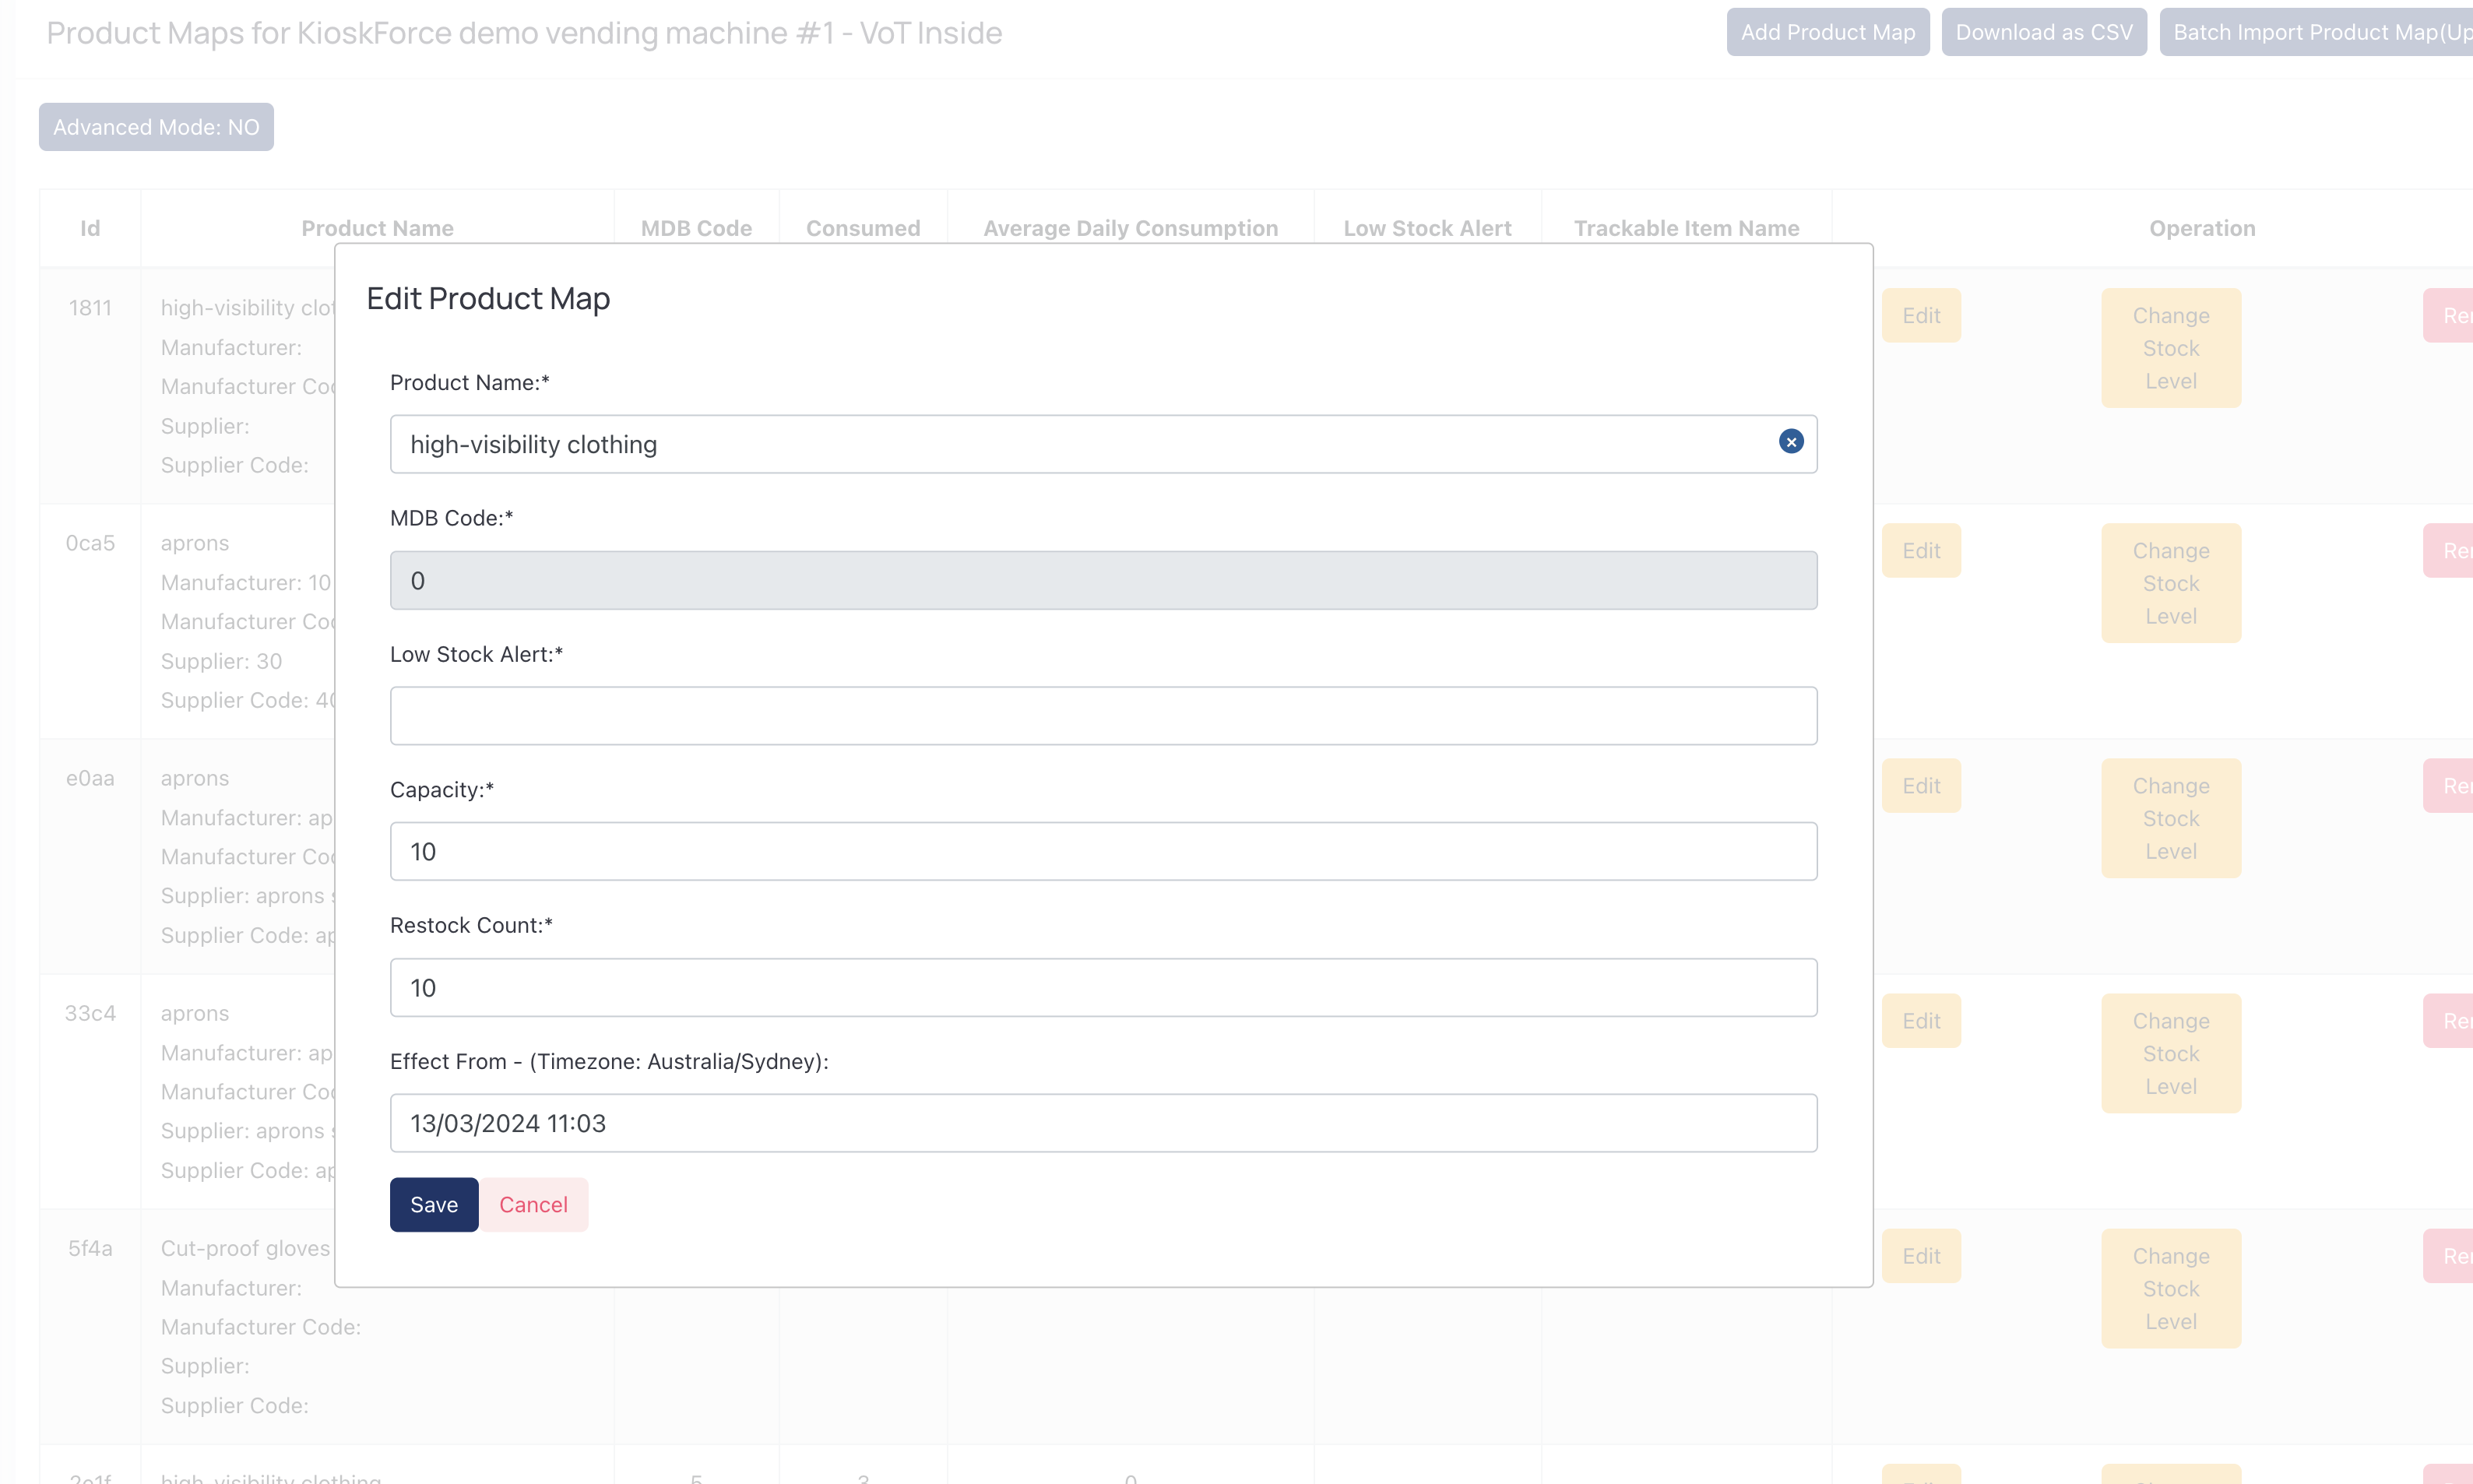
- Start typing in Product Name field, a dropdown menu will be shown.
- Specify a Trackable Item if the product is trackable.
- MDB Code is the vending machine’s identity for that coil/cell. This value is not changeable.
- Low Stock Alert field allows the admin to change the value of a low inventory alert.
- The admin can set up the maximum capacity of the coil in Capacity field.
- Set up the standard product quantity of the coil in Restock Count field.
- Effect From field allows the administrators to backdate a change time, so that all the transactions on that coil happened after that time will be updated to the new product.
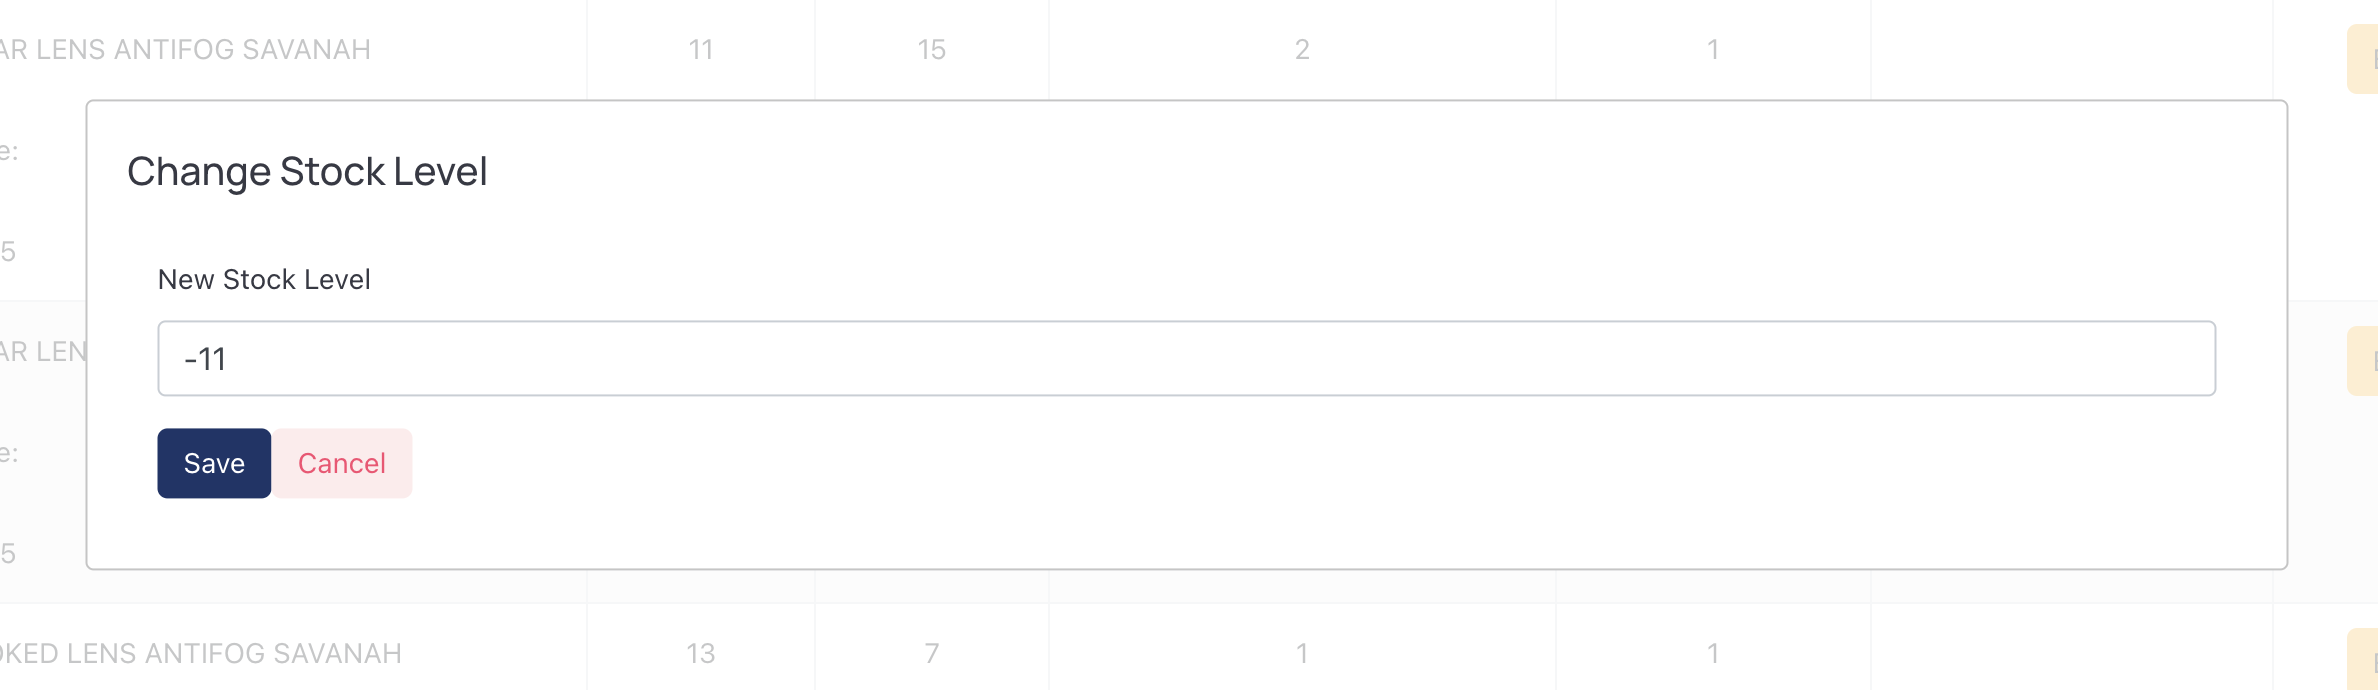
To change the stock level, click on Change Stock Level button.
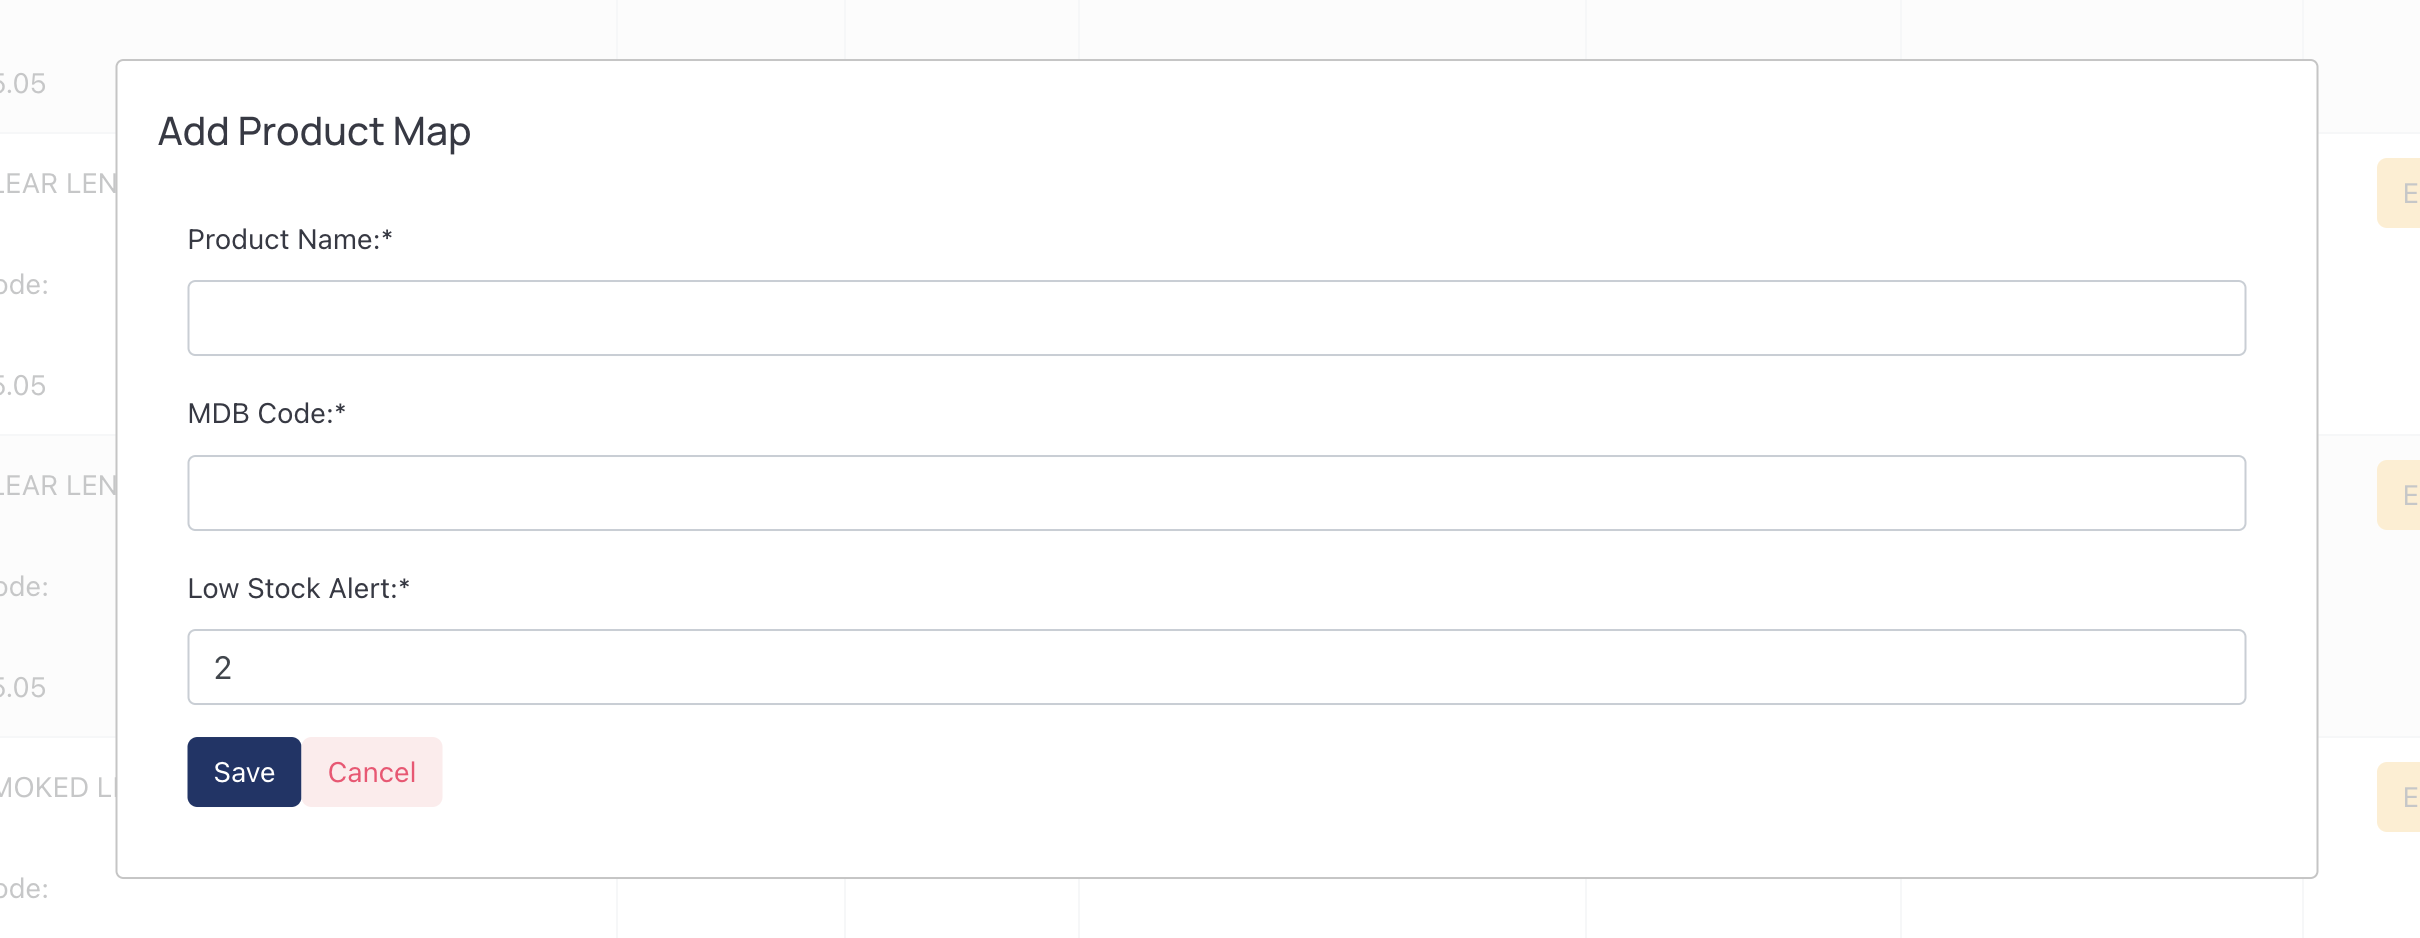
To add a product map, click Add Product Map button on the top right corner of Vending Machines page. As you could notice, when adding product map, you need to specify the MDB code. 
Retrieve Vending Machine QR Code
To display vending machine QR code on the screen, please follow this procedure,
- Visit Vending Machines page
- Find the vending machine on concern, and click QR Code button in the Operation column
- In the popup window, use the Vending Machine QR Code
- Alternatively, you could use download the QR Code with Download QR button
As you may notice, we have two different QR Code for each of the vending machine
- Normal QR Code
- Legacy QR Code - only use this if the vending machine was deployed before July 2020.
Edit Vending Machines
To edit vending machine settings, please follow this procedure,
- Visit Vending Machines page
- Find the vending machine on concern, and click Edit button in the Operation column
- In the popup window, the following machine attributes can be updated,
- Enter a unique name to identify the machine in the Vending Machine Name field.
- Provide the exact address of the machine in Vending Machine Location.
- Set a PIN code for access to the admin portal on the vending machine.
- Search for a timezone, then select it from the dropdown, such as Australia/Sydney or America/Los_Angeles. The machine uses this timezone when recording and displaying local times.
- Configure Notification Emails - Enter email addresses (separated by commas) to receive alerts specific to this vending machine, such as low stock alerts and fail-to-vend notifications. These emails will receive notifications in addition to the organization’s admin emails. This is useful when different teams or locations need to be notified about specific machines.
- Toggle Disable Offline Notifications - When enabled, this machine no longer raises an offline alert, and nobody is emailed, after it has been silent for 45 minutes. Its connectivity is still checked and still shown on the machine list, so the machine does not disappear from your fleet view — only the alert is suppressed. Use it for a machine that is expected to be unreachable, such as a spare in storage or one taken out of service. It is off for every machine unless you turn it on, so offline alerting is unchanged until you do. Turning it back on while the machine is still offline lets the alert for that outage be raised on the next check.
- Toggle Do Not Track Stock - When enabled, this machine stops counting stock. Selections never report as out of stock, so a mistyped refill count cannot stop the machine dispensing an item that is sitting on the shelf; stock levels are not shown for the machine’s selections, the Stock Level button is unavailable, and low stock alerts are not sent for it. Use it while your team is still learning the refill process, or any time the recorded counts have drifted far enough from reality to be a nuisance. Everything else is unaffected: transactions are still recorded, so the Consumed figures and your usage reports stay accurate throughout. Restock the machine before you turn this off again - stock levels reset to full at that moment, exactly as they do when you press Refill, and anything taken while tracking was off is not deducted. It is off for every machine unless you turn it on.
- Toggle Disable Drop Sensor - When enabled, the machine skips the drop sensor check during dispensing. Use this only for machines with unreliable or missing drop sensors that would otherwise raise repeated false fail-to-vend alerts. While the check is disabled, the system cannot confirm whether an item physically dropped, so leave it on for machines that are working normally.
- Optionally, upload a photo of the machine. It is converted to PNG and scaled down to at most 1024 pixels on its longest side when you save, so you can upload a photo straight from a phone without shrinking it first. See Photo uploads for the details.
- Assign tags for the machine if you want to enforce tag-based access.
Kiosk Screen Flow
KioskForce vending machines only.
Three of the settings above control what an employee sees at the kiosk. They are easy to confuse because they sound similar, but each one governs a different moment in the same journey:
| Setting | When it applies | What it decides |
|---|---|---|
| Express Selection | Straight after the employee logs in | Whether they first choose between Take new item and Return item, or go directly to taking an item |
| Quick Dispense (Press and Hold) | While they are looking at the item list | Whether they press and hold an item to dispense it, or step through the item and confirmation screens |
| Stay on Dashboard After Dispensing | After each item is dispensed | Whether they stay on the item list still logged in, or are returned to the login screen |
They are independent — you can use any combination — but together they decide how much tapping it takes to collect one item. A site where people usually take a single item is fine on the defaults; a site where one person routinely collects five items benefits from all three.
Express Selection
Controls whether the Take new item / Return item choice screen appears after login.
- Ask the employee to choose Take or Return first — the choice screen is shown. Use this where people return trackable items as often as they take new ones.
- Skip the choice and go straight to taking an item — the choice screen is skipped and the employee goes to the job ID prompt, or straight to the item list if job IDs are not in use. Employees can still return an item from the button in the corner of the item list.
Note on the naming. This setting is stored as Express Selection, and its Enabled/Disabled wording runs opposite to what you might expect: Enabled adds the choice screen, and Disabled removes it. The descriptions next to each option on the settings page tell you what the option actually does — go by those rather than by the words Enable and Disable.
Quick Dispense (Press and Hold)
When enabled, employees dispense an item by pressing and holding it in the item list, instead of stepping through the item and confirmation screens. A ring fills around the item while they hold it, and lifting a finger before it completes cancels. Holding several items in a row queues them, and they dispense one after another while the employee stays on the item list.
Use this at busy sites where one person routinely collects several items and the extra screens cost time. Before turning it on:
- There is no confirmation screen. A completed hold dispenses the item for real and counts towards the employee’s usage limits, so a mistaken hold cannot be undone.
- It only applies to coil selections that are not trackable items. Locker cells and trackable items keep the normal flow, because they need the confirmation step. On a machine with a mix, only the eligible items respond to press-and-hold, and they are marked in the item list.
- Each hold dispenses one unit. Taking three of the same item means three holds, and they appear as three separate transactions in reporting.
- Turning this on also turns on Stay on Dashboard After Dispensing, and holds it on, because dispensing from the item list only makes sense if the employee stays logged in.
-
The drop sensor is bypassed while quick dispensing, whether or not Disable Drop Sensor is switched on for the machine. Employees quick dispensing normally collect everything at the end rather than after each item, so the items already dispensed sit in the chute across the sensor and it can no longer see anything drop. With the sensor left armed the machine would report items as not dispensed when they were, and stop part-way through a queue on hardware that is working perfectly. For the same reason you will not receive drop sensor alerts for items taken this way — a missing reading is expected here, so alerting on it would bury the alerts that matter.
Faults the machine can still detect and alert on are unchanged: a coil that does not respond, times out, or is misconfigured still fails, stops the queue and notifies you. What it cannot tell you is whether an item that the coil turned for physically dropped, so a jam during quick dispensing is recorded as an item taken.
- While items are still dispensing, the idle auto-logout is paused and the employee cannot leave the screen, so nothing is dispensed after they walk away. Items still waiting in the queue can be cancelled at any time.
- If an item fails to dispense, the queue stops rather than continuing, and anything still waiting is cancelled. The kiosk explains what failed and that pressing and holding will do nothing until the employee taps Clear. Clear restarts the queue only — it does not fix a faulty coil, so if the same selection keeps failing the machine needs attention.
Stay on Dashboard After Dispensing
When enabled, the kiosk stays on the item list (still logged in) after dispensing an item instead of returning to the login screen, so one employee can collect several items in a row without re-authenticating each time. Idle auto-logout still applies.
Leave this off if you want each employee to be logged out automatically after taking an item.
Refill Vending Machine
After physically restocking a vending machine, follow this procedure to make the items available for dispensing again,
- Visit Vending Machines page
- Find the vending machine on concern
- Click Refill in the Operation column to make items available for dispensing again.
To adjust the stock level or restock quantity of an individual coil/cell, use the Change Stock Level button and the Restock Count field in the Product Map settings described above.
Actuator Management
Actuators, also known as peripheral machines, are standalone vending machines or lockers (without touchscreens) that operate under the control of a master machine (kiosk). The master machine can coordinate up to 253 peripheral machines to create a large, distributed vending system. To manage actuators for a master vending machine, click the Actuators button in the Operation column of the vending machines list.
For detailed information about the master/peripheral architecture, MDB address ranges, and actuator configuration, please refer to the Vending Machine Actuators documentation.
Kiosk Behaviour: Dispense Failures, Config Refresh, and Drop Sensor Propagation
The following points explain how a KioskForce machine behaves in day-to-day operation. They set expectations about retries after a failed dispense, how quickly a backend setting change reaches the machine, and how the “Disable Drop Sensor” toggle is applied. These come up frequently as customer questions.
A failed dispense does not lock the coil
When a selection fails to dispense (the motor turned but the item did not drop, the machine timed out, a peripheral did not respond, etc.):
- The kiosk does not mark the coil or selection as broken, disabled, or out-of-order. There is no local lockout.
- The employee sees the error for a few seconds, the screen returns to the item, and they can retry immediately, with no limit — there is no retry counter, cooldown, or lockout on the machine.
- The kiosk reports the failure to the backend so it appears in your alerts and reports, but it does not act on that result itself.
- Any decision to make a selection unavailable is made on the backend. A selection only disappears from the screen when the backend sends that state down — for example when stock reaches 0, or when an admin changes the product map — on the next config refresh (see below).
What this means for admins: a failed dispense will not disable the coil on the machine, and employees can keep trying. If a coil is genuinely faulty and you want it taken out of service, do so from the admin portal (for example by setting its stock to 0 in the Product Map); do not expect the machine to lock it automatically.
Coming soon: an optional per-machine setting will let a coil be taken out of service automatically after repeated consecutive dispense failures, with a company-wide default and manual/auto-clear recovery (an admin can unblock it, and restocking clears it). This will be off by default, so the behaviour described above remains the standard unless you opt in. This section will be updated when that setting ships.
Backend config changes are not instant — expect up to ~13 minutes
The kiosk pulls its configuration (product map, machine settings, drop-sensor state, etc.) from the backend on a fixed ~13-minute timer, plus once shortly after startup. There is no live push, so a change you make in the admin portal is not reflected on the machine immediately.
You can force an immediate refresh at the machine by:
- Opening the kiosk Settings page (or triggering the hidden admin gesture), or
- Restarting the kiosk app.
What this means for admins: after changing a machine setting or product map in the admin portal, allow up to ~13 minutes for the machine to pick it up automatically, or refresh it on the spot by opening Settings / restarting the machine. If the machine is offline or its network is down, it keeps its last known configuration until it can reach the backend again.
Applying a “Disable Drop Sensor” change to a machine
The Disable Drop Sensor toggle (described under Edit Vending Machines) is a backend, per-machine setting. The machine only reads it; there is no on-machine screen to change it. Once the machine has the current value, it is read on every dispense, so no further action is needed.
A change to this toggle takes effect on the machine on its next config refresh — that is:
- Automatically within ~13 minutes (the periodic poll described above), or
- Immediately if an admin opens the kiosk Settings page or restarts the machine.
Important: logging out and back in on the machine does not apply the change. The login screens only read the value the machine already has; the login flow does not re-pull configuration. Do not advise customers to log out and back in to speed this up — it has no effect on this setting. Use Settings or a restart instead, or simply wait for the automatic refresh.
If a config pull fails (for example the machine’s network is down), the machine keeps the previous value until a successful pull, so a stale setting can persist longer than 13 minutes.
Frequently Asked Questions
Q1: What is the difference between Normal QR Code and Legacy QR Code?
According to the documentation, there are two different QR Code types for each vending machine:
- Normal QR Code - This is the standard QR code used for all vending machines
- Legacy QR Code - This should only be used if the vending machine was deployed before July 2020
The system maintains both types to ensure backward compatibility with older machines.
Q2: What is motor coupling and when should I use it?
Motor coupling is a feature for KioskForce vending machines that allows operators to manually couple two separated motors to make them operate in sync. As stated in the documentation:
- It allows dispensing larger items that wouldn’t fit in a single coil
- You can couple motors by clicking the “Add Motor Coupling” button on the Product Maps page
- You need to input both the Main MDB code and Coupled MDB code
- When a coil is coupled, it will show a “Motor Coupling” state in the Product Name column
Q3: What does the “Effect From” field do when updating a product map?
The “Effect From” field allows administrators to backdate a change time. According to the documentation, “all the transactions on that coil happened after that time will be updated to the new product.” This is useful when you need to correct historical transaction data after changing a product mapping.
Q4: What information is tracked in the Advanced Mode for product consumption?
When Advanced Mode is enabled, the “Consumed” column shows additional information beyond just the consumption count:
- Current - The current stock level
- Cap - The maximum capacity of this coil
- Restock - The standard product quantity of the coil
This provides more detailed inventory management capabilities for each coil.
Q5: How do I handle timezone settings for vending machines?
Search for a timezone such as “Australia/Sydney” or “America/Los_Angeles”, then select it from the dropdown. The “Timezone” column in the vending machines list shows the timezone applied by each machine. This ensures accurate timestamp recording for transactions based on the machine’s physical location.
Q6: What are Notification Emails and how do they work?
Notification Emails allow you to configure custom email addresses that will receive alerts specific to a particular vending machine. These alerts include:
- Low stock notifications when product levels reach the configured threshold
- Fail-to-vend alerts when dispensing issues occur
- Other machine-specific operational alerts
Key points:
- Enter multiple email addresses separated by commas (e.g., “manager@company.com, technician@company.com”)
- These emails are in addition to the organization’s admin emails - admin emails will always receive notifications
- This feature is useful for delegating machine monitoring to specific teams, locations, or individuals
- Each vending machine can have its own unique set of notification emails
- Email addresses must be valid format and will be validated when saved
Q7: An item failed to dispense — is the coil now locked out?
Not by default. A failed dispense does not disable the coil on the machine, and there is no retry limit or cooldown — the employee can try again straight away. The failure is reported to the backend for your alerts and reports, but the machine never takes a selection out of service on its own. If a coil is faulty, take it out of service from the admin portal (for example by setting its stock to 0). See Kiosk Behaviour.
An optional per-machine setting to automatically block a slot after repeated consecutive failures is planned; it will be off by default, so this answer holds unless your organization opts in. This entry will be updated when that setting is released.
Q8: I changed a machine setting in the portal but the machine hasn’t updated — why?
Machines pull their configuration on a ~13-minute timer, so backend changes are not instant. Wait up to ~13 minutes for the automatic refresh, or force it immediately by opening the kiosk Settings page or restarting the machine. If the machine is offline, it keeps its last known settings until it can reach the backend again.
Q9: After toggling “Disable Drop Sensor”, do I need to log the machine out and back in?
No — logging out and back in does not apply the change; the login flow does not re-pull configuration. The new value takes effect on the next config refresh: automatically within ~13 minutes, or immediately if you open the kiosk Settings page or restart the machine.